
First-run walkthrough
from zip to first swap quote.
A plain-language tour of the first day: unzip, see the wallet run, create a test wallet, publish your first setting from the admin and see a live swap quote. Each step says what you should see, so you know it worked.
01Before you begin
You will type a few commands into a terminal. That is the black window called Terminal on a Mac or PowerShell on Windows. Copy each command with the Copy button and paste it; you do not need to understand it.
- About two hours for the first time, with breaks.
- A computer with the tools from Requirements. A Mac is needed only for iOS.
- A Google account for Firebase, and a payment card for its Blaze plan (costs).
- A notebook for your test wallet's recovery phrase. Paper, not a screenshot.
Every step links to the detailed page. If a message appears that you do not understand, paste it into the search box at the top left; most are in Troubleshooting.
02Unzip and look around
- Unzip the downloadPut it in a folder without spaces in its name, for example
Documents/superwallet. - Find the three parts
crypto_walletis the app your users install.crypto_wallet_adminis your control panel. The backend lives insidecrypto_wallet(functions,firestore.rules). Architecture shows how they connect. - Optional: try the demosThe header links Wallet demo and Admin demo open the hosted demos with sample data. Nothing you do there touches your own project.
03See the wallet run
The package ships a placeholder Firebase file, so the wallet can start before you connect anything. Sign-in, settings, push and PRO checks stay off until you connect your own Firebase project.
cd crypto_wallet
flutter pub get
cp .env.example .env
flutter run -d chrome --dart-define-from-file=.env
You should see: Chrome opens on the wallet's welcome screen. In the terminal, a line starting with WARN: FirebaseService: dev placeholder credentials detected. That is expected at this point.
04Create your first test wallet
- Create a new walletChoose 12 or 24 words and follow the screens. The app shows your recovery phrase.
- Write the words down on paperIn order. The app may ask you to confirm some of them.
- In a browser: set a vault passphraseRight after you confirm the words, the web build asks for a passphrase of at least 10 characters and a repeat of it. Write that down too. Chrome has no Face ID and no secure chip, so this passphrase is what encrypts the wallet in this browser, and nothing is stored that could recover it. The iOS and Android apps do not ask for it (how it works).
- Finish the remaining screensThe wallet opens on the home screen.
The phrase is created and stored only on this device. Nobody, not you as the operator and not us, can recover it. Treat even a test phrase as real, and never send real funds to a wallet you made while testing in a browser you share. In a browser the wallet also asks for the vault passphrase again before a sensitive operation, such as revealing the phrase or exporting a backup, and before every signing (send, swap, WalletConnect), whatever the amount.
05Connect your own Firebase
This is the longest part. Follow Installation from Create your Firebase project to Create the first admin. In short:
- Create a Firebase projectOn the Blaze plan, with Email/Password sign-in and a Firestore database.
- Connect both apps
flutterfire configurein each app folder. - Deploy the backendRules, Remote Config and the Cloud Functions.
- Make yourself the first adminOne
curlcommand.
You should see: the wallet starts without the placeholder warning, and the admin panel lets you sign in with your email and password.
06Publish your first setting
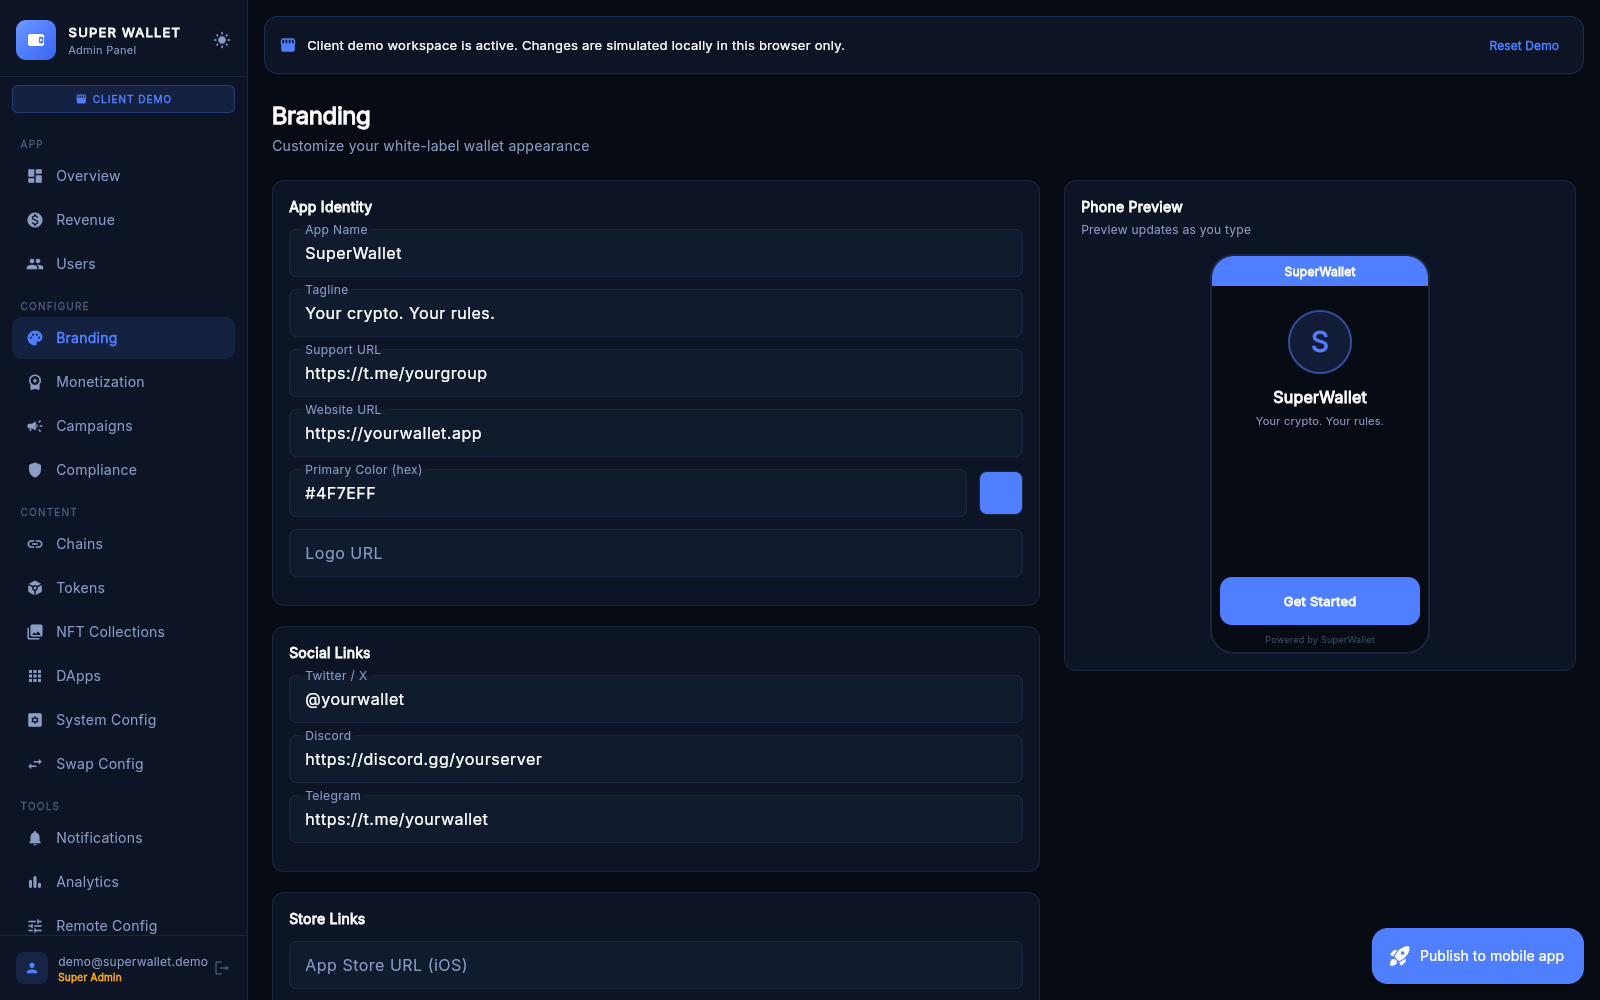
Change the app name from the admin and watch it arrive in the wallet. No new build needed.
- Start the admin panel
Sign in.cd crypto_wallet_admin flutter run -d chrome - Open BrandingType a new App Name, for example
My Test Wallet. The phone preview on the right changes as you type. - Save BrandingA confirmation appears.
- Publish to mobile appThe blue button at the bottom right. Confirm.
- Restart the walletClose it fully and run it again.
- CheckOpen Settings → About App in the wallet. It shows the new name.
What else you can change this way, and what needs a new build: No-code changes.
07See your first swap quote
Live swap quotes on EVM chains need a key from 0x or 1inch (how to get one). Without one, the quote card shows an estimate marked ~ Indicative via CoinGecko, or a quote from a direct DEX router on chains where one is known.
- Add the keyAdmin → System Config → Remote API Keys → 0x Protocol API Key. Click Save System Config, then Publish to mobile app. (Or put
ZEROX_API_KEY=your key incrypto_wallet/.envand run the app again.) - Restart the wallet
- Open SwapPick ETH to USDC on Ethereum and type a small amount, for example
0.01. - Read the quote cardIt now says via 0x Protocol (or via 1inch) with the network fee, price impact and minimum received.
You do not need funds to see a quote. To execute a swap, the wallet needs the token and a little of the chain's coin for the network fee.